Monday, February 18, 2013

Coffee Review: El Salvador La Roxanita by Verve Coffee Roasters

By now, I've had what I would like to consider to be a reasonable amount of coffee from various roasting companies. I'm not claiming to be some ultimate coffee guru or anything even close to that. I'd like to consider myself as a home coffee enthusiast, if you had to call it anything at all. It's just my thing. While other men are glued to the TV arguing over why that coach didn't put that one guy in at that one time, I'm adjusting my grind size and measuring coffee extraction levels. All that so say, out of all the coffee roasters that I've tried I have not yet found one to be better than Verve Coffee Roasters. It may be a premature thing for me to say, but it's my blog and my opinion, so take that! Anyway, without getting deeper into my tangent on how much I like Verve, I'm just going to talk about today's cup. Today we're talking about Verve's La Roxanita. 


El Salvador La Roxanita
Roaster: Verve Coffee Roasters
Region: El Tunel, Chalatenango
Processing: Honey-Process
Varietal: Pacamara


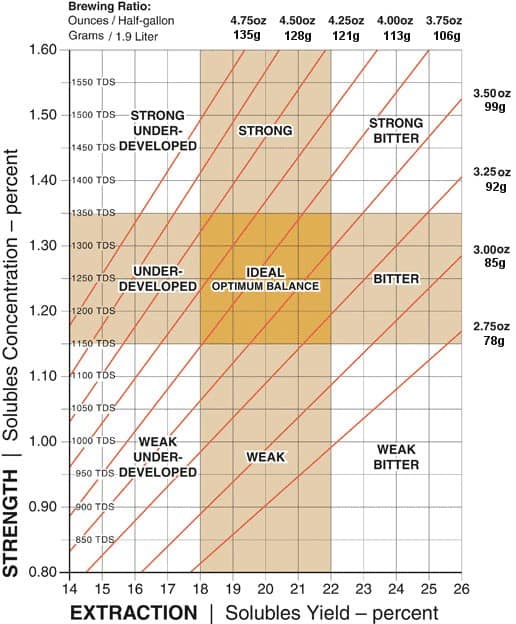
Why calculate TDS and extraction yield when a computer
can do it for ya?
Method: Chemex, paper filter
Grind: Course-Medium (26)
Grind/Water: 19g/300g
Pour Method: 60 (agitate/bloom)-150-200-250 (agitate)-300
Initial Water Temp: 198 F
End Water Temp: 130 F 
Extraction Yield: 21.05%
TDS: ?? (Again! I messed up on my measurements)
Aroma: Chocolate, berries, roses
Taste: Milk chocolate, tinge of orange, subtle berry
Mouth feel: Balanced, smooth


The Verdict:
While being excited for Verve's newest shipment that's come to my door via their free online shipping, I still want to maintain as much of an unbiased opinion of this coffee for the readers sake (you're welcome). That being said, this coffee's fantastic. One thing I can always appreciate about Verve is that whatever the package says it's going to taste and smell like is not an exaggeration of what you're going to get. Initial aroma's reminded me of a chocolate dipped strawberry and roses (not even joking). Basically smelled like Valentines Day in a cup. Once brewed, my first sip had those rich milk chocolate undertones. A couple sips later (as it started cooling) the hint of orange kicked in with some very subtle berry tastes as well. 

Overall, it was a very pleasant experience. It was really good. Very balanced; meaning as it sat in my mouth it wasn't more acidic or more spicy. It was smooth, tasty and stinkin' awesome. Like I mentioned in previous posts, much of the character of the coffee develops even more as it cools. That being said, this definitely maintained it's balanced taste as it cooled down which makes me want to try this things iced. Hmmm. Might have to...

Now I'm all about supporting local, however I'm also about supporting talented and well done. Verve Coffee Roasters really do roast quality coffee and, in my opinion, is one of the best out there. Support local coffee roasters, but please do yourself a favor and try something from Verve. You will not be disappointed with their single origin coffee offerings. And they have free shipping! Come on! You're running out of excuses! Go get some. Oh you don't have a link to their online store? Boom. Here it is.

Any questions? Have you had better coffee that I need to try? Shoot 'em in the comments area and let's talk. 

Tuesday, February 5, 2013

How To Brew That Perfect Iced Coffee

The only thing better than a hot cup of coffee on a cold winter's day is a cold cup of iced coffee on a warm Southern California winter's day. Let's just set the record straight here: Southern Californian's (like myself) have no clue what appropriate winter weather is supposed to be like. We're freezing at anything less than 50° F. That being said, as I looked outside during my lunch break/date with my wife at home, I decided not to waste the beautiful California sunshine and poured myself a tasty iced beverage.

Now when I say iced coffee, I'm not talking about a Starbucks Vanilla Bean Frappaccino or that sweetened McDonalds McCafe. I'm talking about pure iced coffee; the kind of iced coffee that without any sugar or syrups added gives off those amazing fruity notes and that refreshingly crisp finish that invites you for another sip. If you've never had the opportunity to experience coffee in this light, allow me to show you exactly how to make your very own perfect iced coffee right at home.

For this brew, we'll be using the V-60 Pour Over. I like pouring directly into a mason jar for my iced coffee so that I can easily transfer it into the fridge to drink some now and save some for later. These measurements will get you about 24 ounces of iced coffee goodness.

Measurements:
30 g. coffee grinds (course-medium)
470 g. water
200 g. ice

Remember that using good coffee is the key to making good coffee. That may sound redundant and even a bit obvious however it's something that's often overlooked and such a crucial component of making good coffee. I laid out the importance of using good coffee here if you didn't get a chance to check it out.  Today, I'm using Portola's Ethiopia Yukro.

Step 1: Coffee Prep
To avoid sounding like a broken record, I've laid out detailed step by step instructions on the beginning steps for good coffee brewing. If you missed that blog entry, check it out here and follow the first 4 quick steps. For this brew, were using 30 g. of coffee, so make sure you adjust that in step 1.

Step 2: Add Ice
Add 200 g. of ice to your container/carafe. This ice will melt as you begin to pour your hot water through your grinds. Not to worry. We're adding ice at the very end, however this initial ice will cool off your brewed coffee (and is factored into the overall coffee/water ratio) so that the ice you add in the end won't melt as quickly and dilute your coffee with additional water. It'll work, I promise.


Step 3: Start Your Pourin'
When using our pour over, make a habit of allowing your grinds to bloom by doing an initial 60 g. pour/agitation. For those who don't know what the what I'm talking about, check out step 5 on my entry on making amazing coffeeTotal brew time should be at about 4-5 minutes. For today, my pours went as follows:
60 g. (bloom/agitation) → 150 g. → 240 g. →330g. →420 g. (agitate) → 470g. 
Step 4: Done!
Shake up your mason jar or carafe so everything homogenizes and you are good to go! Grab yourself a cup filled with ice and enjoy your beverage. Like I said earlier, this makes about 24 ounces of iced coffee, so unless you want to feel jittery all day long and drink the entire mason jar, you can always put the lid on it and stick it in the refrigerator for later. I've heard some baristas claim that this kind of iced coffee can be left in the fridge for up to two weeks. Personally, I can say that from experience this can be left in the fridge and still taste pretty good for about a week or less. Any longer than that and it'll just start tasting old and stale.

I brought this back to my co-workers to try and the responses were nothing but resounding wow's. Clean, bright, a hint of lime and reminiscent of an iced tea. If you've never experienced a coffee with these kinds of tastes, you owe it to yourself to try out this recipe for iced coffee. It's perfect for your nice summer day, or for us living in Southern California, any day of the week. #boom